Folks, I have a confession to make. I would say I know a fair amount about farming, but I am in no way an expert when it comes to gardening. Farming vs. gardening are two completely different worlds. So when I thought it would be a good idea to start a garden, I was in for a rude awakening with my self-taught ways. I learned a lot the hard way and want to pass my successes and failures along to you with what all I learned.

1. First, know that getting started can be expensive if you don’t already have the tools and infrastructure needed. I’d recommend starting small (maybe under a 10-by-10-foot plot), as the building process can be harder than it looks. Rest assured, it’s quite rewarding to enjoy the fruits of your labor once finished!
This is a photo of the garden that I recently finished building at my Iowa farm:
It’s been a work in progress, one that I’ve chipped away at for years (garage sale finds like the bench have helped make it well worth it), but I’ve also invested in other amenities, such as weed barriers, a mulch path, and small-animal fencing. It’s important to find a store near you that is a good and convenient one-stop shop for all things garden — for some, that may mean a locally owned retailer, while others might lean on regional or national chains to stock up. I went to Theisen’s, a home and farm store in Iowa and Wisconsin. They had a good selection and prices for this project.
2. I started with a sturdy 43cc tiller to create this plot, which measures roughly 19 feet by 34 feet. I used a post hole digger and some basic fencing and posts to create a barrier to keep out critters like rabbits — which will eat everything.
For me, it was vital to have a weed barrier. For years, my busy travel scheduled always overlapped with any gardening I’ve done, so having landscape fabric like this saved me a lot of weed hassle and time. I knew it had to be incorporated into this garden project. This weed barrier was laid down before I created this path. And, for me, good quality is key! If I could turn back time, I would’ve gone with a stronger, more plastic industrial grade product that is more durable and lasts longer.
This is a photo I used for inspiration, which comes from University of Florida horticulture professor Kevin Folta:
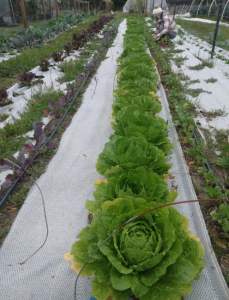
Folta said he has used landscape fabric for years and always had great success. But its use among gardeners can be (and is!) heavily debated.
Some people love using it in vegetable gardens, and it has been touted as eliminating the need to weed by disallowing their seeds to germinate, while also being porous enough to allow some water through. “Here in Florida, you can never keep up with weeds,” Folta said. “It really depends on the application. Weed barriers hold in moisture, and for a small- to mid-size garden, it wouldn’t really be a big deal either way.” When scaled up, Folta noted that weed pressure can sometimes be so intense in Florida that growers resort to what’s called “plasticulture” — essentially huge fields of landscape fabric — for tomato, cabbage, strawberries, and some other field crops. (Barkley Poling from N.C. State University extension has written numerous publications discussing these methods.)
However, the use of landscape fabric has its detractors, too. Depending on the specifics of the fabric, it can prevent water from getting to plant roots. It’s been observed that, over time, small particles of soil or mulch can fill into the pore spaces in the fabric, reducing the amount of water that reaches the soil beneath. Due in part to this, plants mulched with landscape fabric are often not as healthy or vigorous. Other research suggests that carbon dioxide and oxygen exchange at the soil-atmosphere boundary can be affected by landscape fabric and mulch materials.
The dynamic here is something I hope to explore more in an upcoming AGDAILY column, and this small-scale farmer also does a good job explaining many of the pros and cons as they are understood today. For now, like so many other things in food production, it’s clear to me that different production methods have their strengths and weaknesses, and the use of landscape fabric is something that could vary greatly region by region.
At my place in Iowa and for such a small garden, I don’t see a drawback. It’s not a perfect solution, but it works for me.
Regardless, using landscape fabric is not foolproof. If you look toward the right side of my photo with the black fabric, you can see where the weeds are still trying to sprout under the landscaping fabric. I learned the hard way that I should’ve run the tiller through the soil one more time before laying down the fabric. I thought that the weed barrier would automatically kill weeds underneath, but that isn’t necessarily the case. Weeds are jerks. They will find a way, ha! You’ll also need to get the proper “pins” to secure the weed barrier in to the soil.
You can also choose to do straw-bale or raised garden beds, both of which are very popular. I didn’t go that route, but you can Google how to do-it-yourself or try some ready-made ones with proper potting soil.
3. If you decide to do a path, (I love my path!) lay down the bricks or stones as shown above to create a border that the mulch can’t scatter from. I got 8 bags of red mulch for only $20 but ended up needing only 6. I highly recommend using gloves to handle this stuff: I learned the hard way by getting tiny, annoying splinters. I chose a pair with nitrile rubber on the fingers — they’re cheap, cute, and comfy!

4. Besides gloves, this photo illustrates the fun part! Onions, potatoes, seeds — all part of a “jiffy” seed-starter kit. Some indoor seed-starter kits can come with a heat pad to give your seedlings a little growing boost. You’ll start to see them sprout in the house, and there are easy directions on the back of the seed packets and the seed kit that explain how and when to plant. You can also use egg cartons for the seeds, but I think it’s worth it to pay a little more for the full kit. They’re still pretty cheap; around $5.
5. Very important: Know when to transfer your plants outside! Here in Iowa, I usually use Mother’s Day weekend as a good time to transplant outdoors, but it also is still getting below freezing this year, which is pretty unusual. Watch that forecast! While Mother Nature can throw all kinds of things at you, sites like this one are valuable tools for getting a handle on planting seasons for your region/zone, as well as plant-specific guidelines. If weather drops below freezing, you will need to go outside and cover your plants so they don’t die. I use old bedsheets for this.
6. For transferring, I used scissors to cut a hole just big enough to fit my little plant (seedling) beneath the weed barrier. And you can use an extra landscape fabric pin to secure fabric around the plant.
So this is about it for the very beginner basics! Make sure you water your garden every day and watch out for bugs and other pests. You can pick them off by hand or use a little pesticide if you need to. Each plant has a different harvest date so keep your eyes peeled on the progress and know when to pick and enjoy! Figure around 60 to 90 days or so depending on the plant. I don’t pay too much attention to sun and shade, but tomatoes, peppers, eggplants, basil are just some of what I’ve planted that are a little more sensitive to cold. Any info you need will be on the back of the seed packet.
Hope this beginner crash course helped you. Happy gardening!
Michelle Miller, the Farm Babe, is an Iowa-based farmer, public speaker, and writer, who lives and works with her boyfriend on their farm, which consists of row crops, beef cattle, and sheep. She believes education is key in bridging the gap between farmers and consumers.